Part 39 of the HikeLab Ultimate Ultralight Guide Series.
How much pack weight are you carrying just to boil two cups of water? Many hikers spend weeks trimming grams from shelter and clothing while ignoring a bulky cook kit that comes out only a few times a day. A smarter ultralight kitchen and cookware setup can cut weight fast, free up pack space, and make camp feel simpler instead of more cramped.
That is why this guide matters. You already know lighter gear helps. The problem is that kitchen gear gets confusing fast once you compare pots, mugs, stoves, lids, fuels, spoons, and all the “must-have” extras. This article will help you sort out what actually earns a place in your pack.
Ahead, you will learn how to choose an ultralight cook system, which cookware materials work best, what different trips really require, and where hikers usually waste weight. You will also see a few real-world trail examples so the choices feel practical, not theoretical.
Key Takeaways
- The best ultralight kitchen and cookware setup is the smallest system that matches your trip, meals, and weather.
- Most hikers can save meaningful weight by cutting duplicate items, oversize pots, and “just in case” accessories.
- Titanium is usually the top choice for boiling water fast, while aluminum often makes more sense for hikers who cook real meals.
- A lighter cook kit only works if it is easy to use, easy to pack, and reliable in the conditions you actually hike in.
Why Ultralight Kitchen and Cookware Deserves More Attention
Many backpackers treat kitchen gear as fixed weight. It is not. In a lot of kits, cookware quietly adds half a pound to more than a pound once you count the pot, stove, fuel canister, lighter, mug, bowl, spoon, windscreen, and storage sack. That is too much weight for a system built around one basic job: making food and hot drinks.
The good news is that kitchen weight often drops faster than expected. You can replace a 1.5-liter pot with a 750-milliliter pot. You can stop carrying a separate mug if your pot works for coffee. You can remove camp kitchen gear that never leaves the pack. Those changes do not feel dramatic one by one, but together they can reshape your whole loadout.
That happened to Maya on the John Muir Trail. Her first cook kit included a stove, large pot, insulated mug, bowl, heavy spoon, full fuel canister, scrub pad, and spice container. After one shakedown hike, she swapped to a 750-milliliter titanium backpacking pot, kept one long spoon, and dropped the mug and bowl. Her kitchen weight fell by 11 ounces, and she noticed the extra pack space almost as much as the weight savings.
That is the real value of ultralight kitchen and cookware. It is not just about numbers on a spreadsheet. It is about carrying less clutter and making camp routines easier.
Before buying anything new, weigh your current cook kit as one complete bundle. The total usually tells a clearer story than the individual pieces.
How to Build an Ultralight Kitchen and Cookware System
The easiest way to build an ultralight kitchen and cookware system is to start with your meals, not your gear. If you mostly boil water for freeze-dried meals, coffee, oats, or instant noodles, your needs are simple. If you simmer rice, sauté ingredients, or cook for two, your setup changes right away.
Start with these four decisions.
First, decide whether you are a boil-only hiker or a real cook. Boil-only hikers can use a smaller pot, simpler stove, and fewer accessories. Real cooks usually need a wider pot, better flame control, and cookware that handles heat more evenly.
Second, decide how many people the system must serve. A solo hiker can often use a 550- to 750-milliliter pot. Two hikers usually land somewhere around 900 milliliters to 1.3 liters depending on the menu. Carrying a larger pot “just in case” is one of the easiest ways to waste weight.
Third, match the cook kit to the trip length. Short trips can use a tiny fuel setup. Longer trips may justify a slightly larger canister or a system that improves efficiency. REI’s guide on how much stove fuel to take is useful here because fuel planning changes the total system weight, not just the stove choice.
Fourth, think about how the whole kit nests together. A strong ultralight cook system packs tightly. Your stove, lighter, and small fuel canister should fit inside the pot if possible. That keeps your backpacking cook kit compact and protects smaller parts from getting lost.
Liam learned this the hard way on a three-day trip in the White Mountains. He bought several lightweight items, but they did not pack together well. His mug lived in one pocket, his stove floated in his food bag, and his pot bounced around loosely. On his next trip, he rebuilt the kit so everything nested in one pot. The weight change was small, but setup time got faster and his pack carried better.
If your cook kit feels annoying every time you use it, it is probably not dialed in yet.
Best Materials for Ultralight Kitchen and Cookware
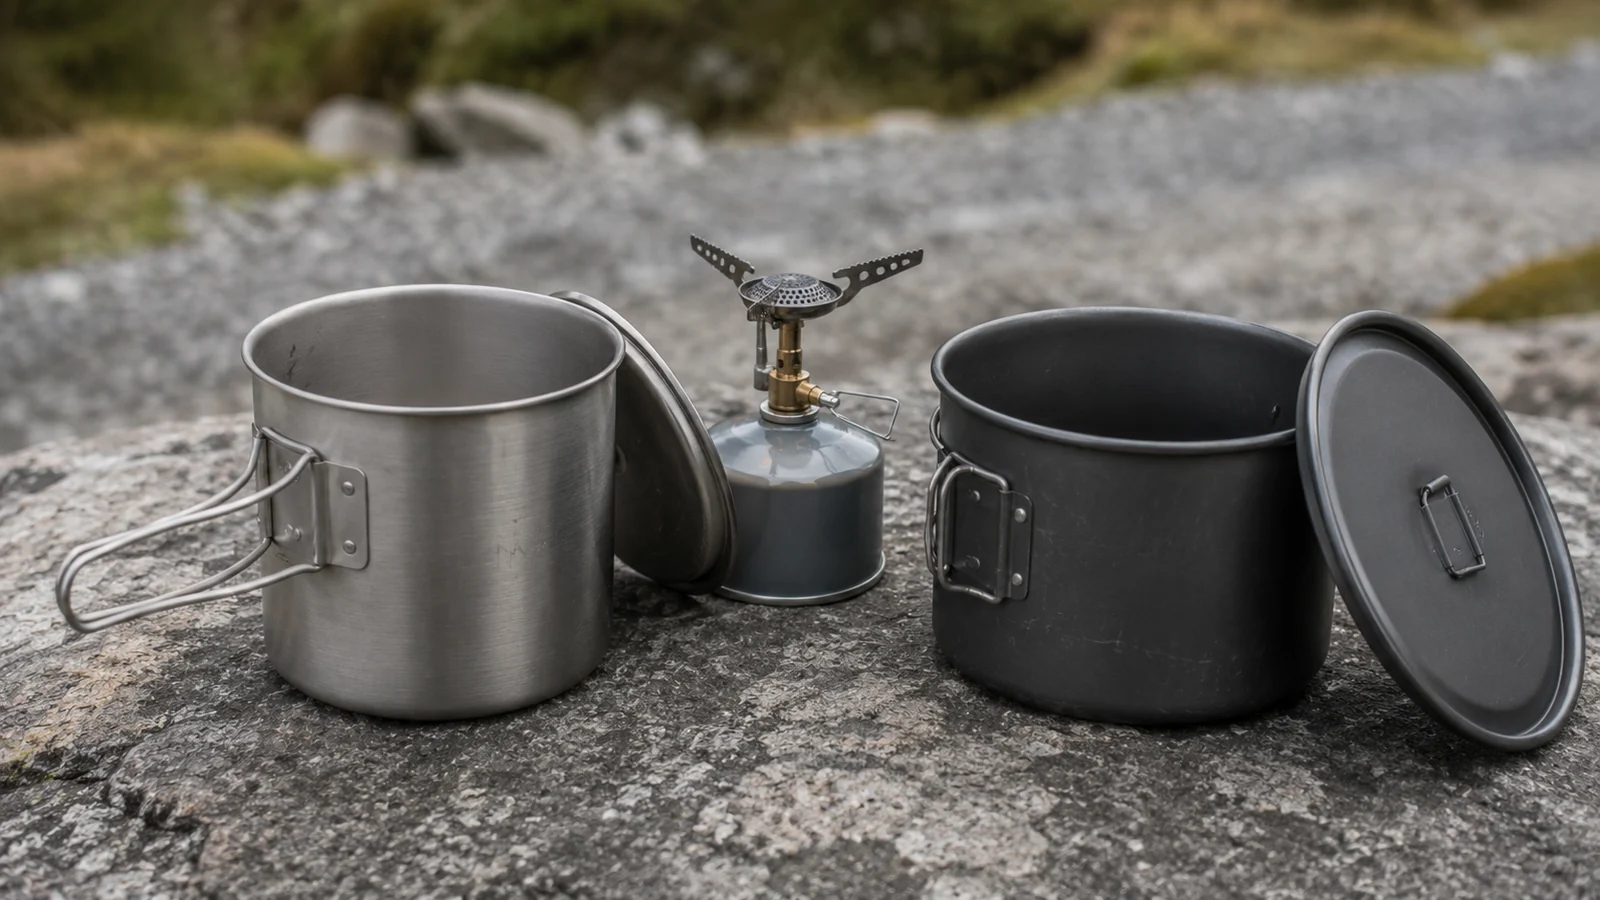
Material choice matters because it affects weight, durability, cooking performance, and price. Most ultralight kitchen and cookware decisions come down to three materials: titanium, aluminum, and stainless steel.
Titanium is the usual favorite for ultralight backpacking. It is strong, corrosion resistant, and very light for its size. A titanium backpacking pot is excellent for boiling water quickly and surviving years of rough handling. That is why it shows up so often in minimalist backpacking stove setup lists.
Its weakness is heat distribution. Titanium can create hot spots, so it is less forgiving if you simmer real meals. If your normal dinner is just boiling water, that tradeoff is easy to accept. If you enjoy cooking in camp, titanium may feel efficient but fussy.
Aluminum is heavier than titanium, but often cooks better. Hard-anodized aluminum spreads heat more evenly and is usually more affordable. For hikers who actually cook, the extra ounce or two may be worth it. The sweet spot is deciding whether your kitchen needs to be the lightest or the most usable.
Stainless steel is durable but usually too heavy for a true ultralight kitchen and cookware setup. It can still make sense for budget hikers, scouts, or people building a loaner kit, but it is rarely the lightest answer.
The National Park Service’s Leave No Trace guidance is a useful reminder here too. The easiest meal cleanup comes from simple cookware, simple meals, and less stuck-on food. That is one reason many hikers stay close to boil-only systems.
Use this quick rule:
- Choose titanium if you mostly boil water and care most about low weight.
- Choose aluminum if you cook actual meals and want better performance.
- Choose stainless steel only if low cost and toughness matter more than ounces.
Ultralight Kitchen and Cookware Setups for Different Trip Styles
There is no single best ultralight kitchen and cookware setup because trip style changes everything. What works for a fast summer overnighter may feel frustrating on a weeklong shoulder-season route.
Solo boil-only setup
This is the classic ultralight choice. Think small canister stove, 550- to 750-milliliter pot, lid, lighter, and long spoon. It is ideal for coffee, oatmeal, dehydrated meals, instant potatoes, and ramen. For many hikers, this is where the best weight-to-function balance lives.
Solo comfort setup
Some hikers want hot drinks and meals without going fully minimal. A slightly larger pot, a more stable stove, and maybe a mug can be worth carrying if camp time is part of the reward. This is still ultralight kitchen and cookware if every item has a clear use.
Two-person shared setup
Sharing cookware often beats duplicating it. One stove and one 1-liter pot can serve two hikers well if the meals are simple. The mistake is bringing two almost-full kitchen systems out of habit. Shared gear is one of the easiest ways to lower combined pack weight.
Cold-soak or no-cook setup
Sometimes the lightest kitchen is almost no kitchen. A cold-soak jar, spoon, and no stove can work well in warm weather. Washington Trails Association has a practical guide to cold soaking backpacking meals if you want to compare that approach.
Shoulder-season setup
This is where being too aggressive can backfire. Wind, cold, and longer nights make hot food more valuable. A slightly more stable backpacking stove setup or a more efficient pot may earn its weight here.
Elena found that out on a wet five-day trek in the Scottish Highlands. She had cut her kit down to a tiny pot built for one fast boil. It worked, but every meal felt cramped, and hot drinks took multiple rounds. On the next trip, she carried a slightly larger pot and shared it with her partner. The system weighed a little more, but morale was much better and fuel use dropped.
The lesson is simple: light enough is better than theoretically lightest.
What You Can Leave Behind Without Regret
A lot of ultralight kitchen and cookware savings come from subtraction. Backpackers often upgrade the main pot and stove while keeping a long tail of small extras that add weight with almost no payoff.
Here are the most common cuts.
- Separate bowl: usually unnecessary if you eat from the pot or meal pouch.
- Dedicated mug: easy to skip unless hot drinks are central to your routine.
- Pot grabber: often avoidable with handles, a bandana, or careful technique.
- Large scrub kit: a tiny square of sponge or just water is enough for simple meals.
- Extra utensils: one long spoon solves most meal types.
- Oversize fuel canister: useful only when the trip length truly requires it.
- Stuff sacks for every item: nesting the full cook kit often removes the need.
This does not mean comfort items are wrong. It means they should be chosen on purpose. If a mug makes cold mornings much better, carry it and drop something else instead. Good ultralight choices are honest choices, not performative ones.
Lay out your full backpacking cook kit and remove one item at a time by asking, “What breaks if I leave this home?” If the answer is “not much,” that item is a strong cut candidate.
Common Ultralight Kitchen and Cookware Mistakes
The most common mistake is chasing the lightest individual item instead of the lightest useful system. A tiny pot looks impressive online, but it is not helpful if your meals spill over or require multiple boils. A featherweight stove is not a win if it performs badly in wind and wastes fuel.
Another mistake is ignoring packability. A good ultralight cook system should store cleanly and deploy fast. Loose parts create friction, and friction tends to turn “light” gear into annoying gear.
Many hikers also underestimate how much their cooking style matters. If you sauté, simmer, or cook from scratch, a boil-only kit will disappoint you. If you only add hot water to pouch meals, a larger cooking pot is dead weight.
Then there is the classic duplication problem. Pot plus bowl. Pot plus mug. Spoon plus spork plus backup spoon. Those overlaps add ounces with no clear gain.
Derek ran into that on the Appalachian Trail. He had built a lightweight kitchen on paper, but he still carried a mug because “everyone carries one.” After two weeks, he realized he used it only twice. He mailed it home, drank from his pot when he wanted coffee, and never missed the extra item.
One more mistake deserves mention: never testing at home. A short backyard boil tells you whether your lid rattles, your spoon reaches the bottom, your stove feels stable, and your fuel plan makes sense. That is ten minutes well spent.
A packed-and-unpacked test catches the same problems faster than any spec sheet. Nest the whole kit, close the pot, then open it and set up as if you were making dinner in wind. Anything that will not go back inside the pot is either a duplicate or the item you should be arguing about.
How to Choose the Right Ultralight Kitchen and Cookware for You
By this point, the decision is less about gear brands and more about self-awareness. The right ultralight kitchen and cookware setup supports your actual habits on trail.
Ask yourself five simple questions.
What do you really eat on trail? If the answer is instant meals and coffee, stay minimal. If you enjoy cooking, give yourself cookware that supports that style.
How important are hot drinks? Some hikers will happily drink from the pot. Others want a separate mug every morning. Either answer is fine, but it should be an intentional tradeoff.
How often do you hike with a partner? Shared cookware can reduce total group weight dramatically. Buying only for solo use may limit you later.
What weather do you hike in most? Warm, dry summer trips support more aggressive ultralight choices. Cold and wet trips call for a little more margin.
How much annoyance are you willing to tolerate to save weight? That question matters more than people admit. The best ultralight kitchen and cookware setup is the one you still like on day four when you are tired, hungry, and setting up in wind.
If you are still unsure, start with a conservative minimalist setup: a small pot, one stove, one spoon, and no duplicate drinkware. Use that for two or three trips. Then cut or add based on experience, not internet pressure.
FAQ
How do I choose ultralight kitchen and cookware for backpacking?
Start with your meal style, trip length, and group size. If you mostly boil water, choose a small pot and simple stove. If you cook real meals, prioritize cookware that handles heat more evenly.
What is the lightest ultralight kitchen and cookware setup?
The lightest practical setup is usually a small titanium pot, a compact stove, a lighter, and one long spoon. Some hikers go even lighter with a cold-soak system and no stove at all.
Why do many hikers use a titanium backpacking pot?
Titanium is light, strong, and great for boiling water fast. That makes it a strong fit for minimalist backpacking cook kit setups focused on dehydrated meals, oats, coffee, or instant soups.
Which cookware material is best for an ultralight cook system?
Titanium is best for most boil-only systems, while hard-anodized aluminum is often better for hikers who simmer or cook actual meals. Stainless steel is usually the heaviest option.
When should I carry a larger cook kit instead of going ultralight?
Carry a larger or more capable kit when you hike in cold weather, cook for two, make real meals, or know that hot food is central to your comfort. Going lighter should improve the trip, not make camp feel worse.
Build a Lighter Kitchen That Still Works
An ultralight kitchen and cookware setup should solve problems, not create new ones. The goal is not to own the smallest pot on the trail. The goal is to carry the least kitchen gear that still lets you eat well, pack efficiently, and enjoy camp. That usually means a small, well-packed system with no duplicate items and no fantasy accessories.
If you remember one thing, make it this: build your cook kit around your meals and conditions, then trim everything that does not support that job. For some hikers, that leads to a tiny titanium pot and a single spoon. For others, it means accepting one or two extra ounces for better cooking or better shared meals.
Take ten minutes today and audit your current setup. Weigh the full kit, remove the extras, and identify the one change that gives you the biggest payoff. Then test the revised system on your next short trip. That is how you build an ultralight kitchen and cookware kit that feels smart in the real world, not just light on paper.
Next Steps
- Read Ultralight Cooking Systems for stove vs no-cook comparison.
- Check Cold Soak Backpacking Food System for the no-cook alternative.
- Review The First Kilogram to Cut to see where kitchen weight ranks against everything else.
Sources
- REI — How Much Stove Fuel Should I Take? — fuel planning and total system weight
- Washington Trails Association — How to Cold Soak Your Meals — the no-stove comparison point
- National Park Service — Leave No Trace Seven Principles — cleanup, greywater, and food residue
- U.S. Forest Service — Know Before You Go: Fire — stove and fire restrictions by area
Napište komentář